Nirvana Odu

Odiani’s nostalgia

  • Mudi—just the mention of it brings back a flood of nostalgic memories. Growing up, I loved jhaal mudi, but my deep connection with mudi truly blossomed after I got married. In my extended family, mudi is like a staple—something we can devour any day, anytime. It’s the ultimate comfort food, ready to eat when you’re running short of rice, and always there when hunger strikes.

    I was introduced to many sides to enjoy with mudi, but this monsoon, we discovered something new: the perfect pairing of Aloo Chop Pakudi! It was one of those lazy days when we decided to make aloo chop from scratch. And trust me, it’s worth the effort.

    Back in the day, whenever we couldn’t cook, my father-in-law would make a quick trip to the local shop to get some fritters and mudi, making it an ideal snack, especially during travel. It was always a lifesaver—mudi was a guaranteed meal, and as they say, no one stays hungry when mudi is home. It’s just as essential as the rice bag in the pantry!

    Preparation Time:

    30–40 minutes


    Ingredients for Mudi, Aloo Chop Pakudi:

    For the Aloo Chop:

    • 2–3 medium-sized boiled potatoes (aloo)
    • 1/2 tbsp mustard oil
    • 1/2 tbsp mustard seeds
    • 1/4 tsp asafoetida (hing)
    • 1/4 tsp turmeric powder
    • 2–3 green chilies (chopped)
    • Salt (to taste)
    • 1 tsp coriander powder
    • 1 tsp chat masala
    • 1/2 tsp black salt
    • Fresh coriander leaves (optional, for garnish)

    For the Besan Coating:

    • 1 cup besan (gram flour)
    • Water (as needed to make the batter)
    • A pinch of ajwain (carom seeds)
    • Salt (to taste)

    Method:

    Step 1: Prepare the Aloo Chop Filling

    1. Boil the potatoes until soft and mash them once they’ve cooled down.
    2. In a pan, heat mustard oil and sputter mustard seeds, asafoetida, and turmeric powder.
    3. Add chopped green chilies and sauté for a minute.
    4. Add the mashed potatoes to the pan. Stir and mix well, ensuring the spices blend into the potatoes.
    5. Add salt, coriander powder, and mix everything together.
    6. Once the mixture cools down, sprinkle in chat masala and black salt. If desired, mix in some fresh coriander leaves.
    7. Shape the spiced mixture into small balls. Set aside.

    Step 2: Prepare the Besan Coating

    1. In a bowl, add besan and mix with water to create a smooth batter (not too thick).
    2. Add a pinch of ajwain (for flavor) and salt to taste. Mix until well combined.

    Step 3: Fry the Aloo Chop Pakudi

    1. Take each potato ball, dip it into the besan batter, ensuring it’s well-coated.
    2. Heat oil in a frying pan over medium flame.
    3. Fry the coated aloo chops in batches until golden brown and crispy.
    4. Once fried, remove them from the oil and drain the excess oil on a paper towel.

    Serving:

    Serve these hot, crispy Aloo Chop Pakudis with mudi on the side. Enjoy them with mustard oil seasoning, onions, achar (optional), mixture of your choice (optional), more green chillies and sprinkle some black salt.

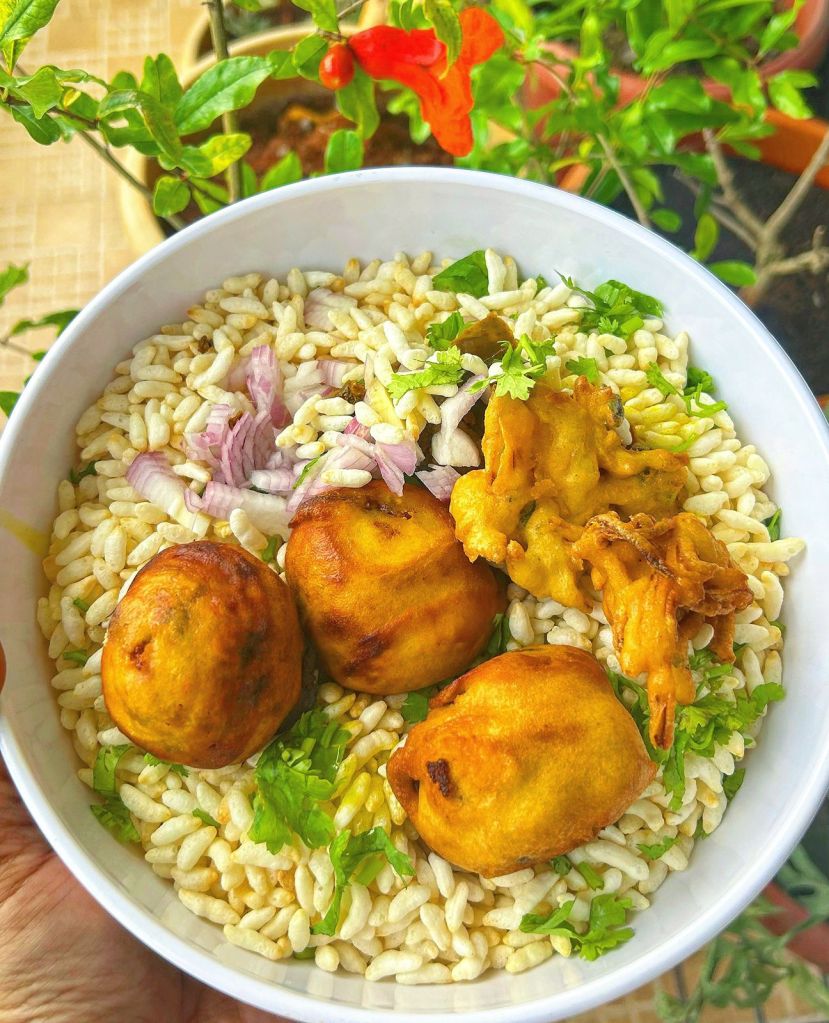
    Mudi and Aloo Chop Pakudi bring back those moments of comfort and nostalgia. Whether it’s a lazy monsoon day, a quick snack on a busy evening, or a travel companion, this combo never fails to hit the spot. And, of course, when you have mudi at home, no one ever stays hungry!

  • 🌸 Raja Parba 🌸

    Pahili Raja – ପହିଲି ରଜ

    “Celebration of Womanhood and Mother Earth” begins today with Pahili Raja—the first day of the three-day-long festival”.

    After the “Sajabaja” day, Maa would put tippa tippa (kumkum) on my forehead as part of the beautifying ritual. While she was deeply invested in the tradition, I was more restless to run out and join my friends. The highlight of the day? The rope swing! Decorated with mango leaves and marigolds, it hung from the sturdy jamun tree in our yard, carrying the laughter of carefree moments.

    As a child, I was a notoriously picky eater, and pithas (traditional rice cakes) weren’t exactly my favorite. Maa, knowing my quirks, used to make a special version without coconut molasses just for me. The festival also meant three days of new dresses—although, I usually convinced my grandfather to trade two of them for a new pencil box or a set of colored chalks. Practical gifts, right?

    Fast forward to today, and adulthood has taught me to appreciate the traditions I once took for granted. Now, my heart is filled with nostalgia, and the aroma of pithas wafting from the kitchen feels like a warm embrace. On this special day, let me take you on a journey with a traditional Raja recipe—Chunchi Patra Pitha, straight from my childhood memories!


    Chunchi Patra Pitha Recipe

    Preparation:

    1. Batter:
      • Soak basmati rice overnight.
      • Grind it in the morning into a smooth, thin paste (the consistency should be flowy, like milk).
      • Add a pinch of salt and let the batter rest for 30 minutes, covered.
    2. Filling:
      • Heat a pan on low flame and add jaggery (break it into small pieces for faster melting). Add a splash of water to help it dissolve.
      • Once the jaggery melts and bubbles form, add grated coconut, powdered elaichi (cardamom), chopped cashews, and kishmish (raisins).
      • Keep stirring the mixture to prevent it from burning. Turn off the flame when the mixture thickens and the water dries up. Set aside.

    Cooking Process:

    Remove from the pan, and your Chunchi Patra Pitha is ready to serve!

    Prepare the Pan:

    Heat a pan on low flame and grease it with desi ghee. Sprinkle some water over the pan and wipe it clean with a cloth or tissue.

    Form the Pitha Sheets:

    Take a clean rectangular muslin cloth. Dip it into the batter and smear it over the pan in a crisscross or “+” shape to create a thin sheet.

    Avoid layering too much batter; thin sheets make the pithas delicate and soft.

    Assemble the Pitha:

    Place a spoonful of the coconut-jaggery filling in the center of the sheet.

    (Optional) Lightly grease the batter layer with ghee for added flavor.

    Fold the edges over the filling to create a pocket.

    Final Touch:

    Flip the pitha over and let it cook on the other side for about 5 seconds.

    The beauty of Raja Parba lies in these small yet deeply cherished rituals. With every bite of Chunchi Patra Pitha, I am reminded of childhood swings, Maa’s gentle hands putting tippa on my forehead, and the irreplaceable aroma of tradition and love wafting from the kitchen.

    Happy Raja! 💕 Let’s celebrate the flavors of nostalgia together!

    Raja special!

    (more…)
  • I was bored of ladoos! It’s time for Milk Peda to take over. This gorgeous rose pattern was a quick and all time love ! Yeah, my neighbour said so.

    When I think about Diwali, pedas are the first thing that come to mind. Not just for their sweetness but the melt-in-your-mouth texture. In our house, ladoos always played second fiddle to pedas during this festival. Diwali prep meant all the ladies of the house sitting cross-legged on the floor, surrounded by bowls of boondi, gujiya dough, and stacks of silver foils for pedas. I’d hover around like a sugar-deprived ninja, waiting to steal a bite. I just can’t resist!

    Grown up – I still love pedas, but I thought why settle for ordinary when you can make them extraordinary? That’s when I stumbled on this rose design. One attempt, and I was hooked. These pedas are not only easy to make, but they’re also so looked stunning!

    Now, let me take you through the quick baby steps to make these beauties:

    Thinking about Peda / Pera reminds me of Diwali. In Diwali, pedas played an important role instead of the ladoos!

    All ladies in the house would sit down to make pedas, boondi, gujiya and some savories.
    This is milk/doodh Peda !!
    The process of making the Peda is super easy!
    Ingredients:

    • 1 tbsp ghee (because everything tastes better with it)
    • 1/2 cup milk (the hero ingredient)
    • 1 cup milk powder (where all the magic happens)
    • Cardamom powder (for that festive kick)
    • Powdered sugar (sweeten to taste, but don’t overdo it—you’re sweet enough!)
    • Red and green food colors (optional, but why not go all out?)

    How to Make It:

    1. Start Stirring Like a Pro:
      • Heat 1 tbsp ghee in a non-stick pan (non-stick saves lives—or at least your pedas!).
      • Add 1/2 cup of milk and 1 cup of milk powder. Stir it like you mean it to avoid lumps.
    2. Turn Up the Heat… But Not Too Much:
      • Add another 1/2 cup of milk and keep stirring. The mixture will turn smooth, thick, and glossy. This is your moment—don’t stop!
      • When the mixture starts leaving the pan (like a good roommate finally moving out), it’s time to take it off the heat.
    3. Add Flavor and Cool Down:
      • While the mixture is warm (not hot!), add cardamom powder and powdered sugar. Mix until it’s all well combined.
      • Knead it into a smooth dough once it’s cool enough to handle.
    4. Divide, Color, and Conquer:
      • Separate the dough into two portions. Add red food color to one and green to the other. Knead until the colors are evenly blended.
    5. Rollin’, Rollin’, Rollin’:
      • Roll out the red dough on a sheet of parchment paper. Use a bottle cap (or anything round and fancy) to cut out small circles.
      • Start rolling one circle into a tight tube (this will be the center of your rose). Add more circles around it, overlapping slightly, to create petals. Be gentle—roses don’t bloom under pressure!
    6. Leaf It to Creativity:
      • With the green dough, cut out small half-moon shapes for leaves. Stick them onto your rose to complete the masterpiece.

    Serve this beauty:

    Your rose-patterned pedas are ready to wow the crowd! Place them on a beautiful platter and watch as people hesitate to ruin your creation… but only for a moment, because these pedas are too irresistible to ignore.

    Every bite of this peda takes me back to the hustle and bustle of Diwali prep—the chatter, the laughter, and the sweet aroma of tradition wafting through the house. While this rose design is a modern twist, it’s still rooted in the love and creativity that define every festive recipe.

    Rose peda
    (more…)
  • I remember, my grandma used to make Kakara Pitha without any coconut stuffing. Just the dough—crispy, crunchy, and utterly delightful. The kitchen would always be filled with the amazing aroma of coconut and jaggery, signaling that the festive magic was about to begin. The sound of sizzling pithas frying in the pan still lingers in my mind. Those moments were simple yet so joyful.

    Today is Basi Raja, the third day of celebrating Motherland and Womanhood! Every occasion has its significance, but let’s be honest—Pithas are the true stars of the celebration.

    I absolutely love my kitchen during Raja—the wonderful redolence of freshly made Pithas, the sweetness of Mithas, and the joy of a hearty lunch are pure bliss. It’s bittersweet knowing that this festival will soon end, and we’ll have to wait until next year to experience it all over again.

    But before it all wraps up, I’m sharing a quick recipe for Kakara Pitha—a festive delight that’ll bring a smile to your face and fill your home with the warmth of tradition.

    Ingredients:

    • For the Stuffing:
      • Grated coconut
      • Cardamom
      • Jaggery
      • Ghee
      • (Optional: Cashews)
    • For the Outer Covering:
      • Sooji (Semolina)
      • Water
      • Salt
      • Sugar
      • Oil (for frying)

    Method:

    1. Prepare the Stuffing:
      • Heat 1 tbsp of ghee in a pan.
      • Add the grated coconut, cardamom, and jaggery. Stir and fry until everything melts into a sweet, fragrant mixture.
      • For an extra touch of richness, add cashews to the mix if you’d like.
    2. Make the Outer Covering:
      • Boil water and add salt and sugar to it.
      • Gradually add the sooji (semolina), stirring gently to avoid lumps. The batter should be thick, so don’t add too much water.
      • Once the mixture thickens and reaches a smooth consistency, remove it from the flame and set it aside to cool.
    3. Shape the Pithas:
      • After the batter cools down a little, grease your hands and roll the dough into small balls.
      • Flatten each ball with your fingers and place the coconut stuffing in the center.
      • Mold the dough back into a ball, then flatten slightly to form the signature shape.
    4. Fry the Pithas:
      • Heat oil in a pan and fry the pithas until golden brown.
      • The crispy exterior and sweet coconut filling will make these Kakara Pithas irresistible!

    Kakara Pitha is ready to be served! Crispy on the outside, with a sweet coconut filling inside (or without, if you prefer the traditional style). Either way, these Pithas are a true taste of Raja and the cherished memories they carry.

  • This iHere’s a classic vanilla cake recipe—simple, sweet, and a family favorite! In our home, eggless cakes are always preferred, and this one never fails to impress.

    When it comes to baking, I don’t need much motivation—just the thought of the aroma filling the house is enough! Now, here’s the thing: my younger sister loves all flavors except chocolate (yes, except chocolate! ), while I’m a hardcore chocoholic. So, how do we compromise?

    Well, after some sweet negotiations, vanilla flavor won the vote! And let me tell you, it was worth it.

    To make things better, I even managed to whip up a batch of homemade butter from leftover milk while baking this. (Two birds, one stone, right?)

    Of course, the rainy weather and an unexpected power cut tried to sabotage my frosting dreams, but this cake turned out to be a lockdown moment of joy nonetheless.

    Mom’s verdict? “It’s tasting great—perfect sweetness!” Her words were music to my ears. With its smooth texture and the heavenly aroma of fresh-baked vanilla, this cake is a winner for any occasion.

    The Recipe

    Before starting, remember:
    Chill your whisk, cream, and mixing container in the refrigerator at 3°C.

    Ingredients:

    • Dry Ingredients:
      • Powdered sugar: 1 cup
      • Flour: 2 cups
      • Baking powder: 1/2 tsp
      • Baking soda: A pinch
      • Salt: A pinch
    • Wet Ingredients:
      • Unsalted butter: 1 cup
      • Milk: 1 cup
      • Buttermilk: 1 tbsp (optional)
      • Vanilla essence: 2 tbsp
    • For Frosting:
      • Cream: 1 cup
      • Powdered sugar: 1/2 cup
      • Cherries (optional)
      • Sprinkles (optional)

    Method:

    1. Prep Your Ingredients:
      • Preheat your oven to 160°C.
      • Sift together the flour, baking powder, baking soda, and salt into a container. Mix well and set aside.
    2. Mix Wet Ingredients:
      • In a mixing bowl, whisk sugar and butter until creamy.
      • Add milk and whisk again until well combined.
      • (Optional) Add buttermilk for an extra soft texture.
    3. Add Vanilla and Fold in Flour:
      • Stir in the vanilla essence.
      • Gradually fold in the dry ingredients (flour mixture) using the cut and fold method. Avoid whisking vigorously—gentle folding ensures a light and airy batter.
    4. Bake the Cake:
      • Grease your cake molds and pour in the batter.
      • Bake for 30 minutes at 160°C.
      • Check with a toothpick—if it comes out clean, your cake is ready!
    5. Cool and Frost:
      • Allow the cake to cool completely. You can slice it in half or bake two separate layers for stacking.
      • Whisk the cream with sugar until soft peaks form. Spread it evenly over the cake, and decorate with cherries or sprinkles as desired.
    6. Chill and Serve:
      • Refrigerate the cake for at least 1 hour before serving.
      • Clean up the mess (a must for all bakers!) and get ready to enjoy your masterpiece!
    Vanilla Cream Cake

    A smooth, spongy vanilla cake with the perfect hint of sweetness, complemented by light and fluffy frosting. It’s a dessert that’s both comforting and celebratory—a slice of happiness in every bite!

    So, whether it’s for midnight cravings, a family celebration, or just a cozy day in, this vanilla cake is bound to impress. Enjoy baking and even more—enjoy eating it!

  • The moment I hear the name “Khiri”, a flood of memories comes rushing back. The smells, the sights, the sounds—all take me straight to my hometown and the warmth of my Ayi and Bapa. Khiri isn’t just a dessert for me; it’s an experience—a dish that weaves so many stories of my childhood.

    I’ve always believed that Khiri shouldn’t be white. It had to have that rich, brownish hue—the kind that promised the perfect balance of sweetness and warmth. This was the khiri that would really satisfy my cravings. I can vividly remember sitting cross-legged in the Mandir Bhoji as a child, eagerly awaiting my turn for khiri served on a Khali Patra (a plate made from dried leaves). I would slurp it down, my little heart racing, but I was always too shy to ask for more.

    At home, Ayi would make khiri for my birthday. I never got to see the process, but I knew it took hours of patience and love. She’d work over the stove, preparing the most aromatic khiri that made the entire house smell like Diwali in August.

    It wasn’t until recently, when I stumbled upon the recipe on Odiyarasoi by the incredibly inspiring @swetabiswal, that I was able to revive this nostalgic recipe. Being a beginner in the kitchen, it was a revelation—a priceless lesson that allowed me to reconnect with those childhood memories.

    Khiri Recipe:

    Now, let’s get cooking! Here’s the recipe that will bring the aroma of nostalgia to your kitchen:

    Ingredients:

    • Broken rice or Basmati rice (soaked in water)
    • Generous amount of ghee (because why not?)
    • Crushed cardamom seeds
    • Sugar (for that perfect caramelization)
    • Full cream milk
    • Water
    • Dry fruits for tempering (cashews, almonds, or whatever your heart desires)

    Method:

    1. Prepare the Rice:
      • Soak the rice (either broken or Basmati) in water.
    2. Ghee Time:
      • Heat a generous amount of ghee in a pressure cooker.
      • Add the soaked rice and stir gently, coating it well with the ghee.
      • Add the crushed cardamom seeds and keep stirring to avoid any burning.
    3. Caramelize the Rice:
      • Add sugar and fry it until the rice turns a lovely brownish color, releasing that sweet, fragrant aroma.
    4. Add Liquids:
      • Now, add 1/3 cup of water and 1 cup of full cream milk to the mixture.
      • Close the lid of the pressure cooker and cook for 4 whistles.
    5. Whisk and Press:
      • After cooking, whisk the rice gently, pressing the grains to release all the sweet goodness. Be careful—don’t spill any of that beautiful milk!
    6. Tempering & Final Touch:
      • In a separate tempering pan, heat some ghee and add dry fruits. Once roasted, pour them over the rice mixture.
    7. Let It Set:
      • Let the rice cook well with the milk. Once it’s done, allow it to cool down before serving.
      • Khiri is best served chilled, so let it cool in the fridge before digging in.

    So, the next time you’re craving something sweet, make this Khiri. It’s not just a recipe; it’s a slice of tradition, a dash of nostalgia, and a whole lot of love.
  • Ah, Custard Pudding—this delicious treat is one of my absolute favorites! Last time I made it, things didn’t go quite as planned. Unfortunately, the pudding spilled out of my hands, and all my cravings were left unfulfilled. Talk about a dessert disaster!

    But, success is sweet (literally!) this time. Midnight cravings? Totally sorted! Though, to be honest, my husband’s cravings are higher than mine —he can out-sweet-tooth anyone in the house. Even my mom and sister, who share an unholy love for all things sweet, get their fill of desserts during these times.

    Before they turn into Dora the Explorer (discovering every dessert in the house), I rush to restock the fridge with delicious treats. So here’s how you can make this creamy Custard Pudding too!

    Ingredients:

    • Sugar (for caramelizing)
    • 1/2 cup milk
    • 1/4 cup custard powder
    • 2 slices of bread (edges removed)
    • Sugar (to taste)
    • A few drops of vanilla essence

    Method:

    1. Caramelize the Sugar:
      • Start by caramelizing the sugar in a pan. Pour the caramel into the container you’ll use to set your pudding. Swirl it around to coat the bottom evenly, and let it cool and harden.
    2. Prepare the Custard Mixture:
      • In a saucepan, bring the milk to a boil. Meanwhile, mix the custard powder (1/4 cup) with a little bit of milk (1/2 cup) in a separate bowl to create a smooth mixture.
    3. Blend the Bread:
      • Remove the crusts from the bread slices and blend the bread into a smooth paste. This is going to add that lovely texture to the pudding.
    4. Create the Custard Base:
      • Once the milk has boiled, add sugar to it and stir until dissolved. Now, slowly pour in the custard mixture while stirring continuously to avoid lumps. Keep stirring until the mixture thickens and turns creamy.
    5. Combine the Bread with the Custard:
      • Gradually add the blended bread to the custard mixture, stirring well after each addition. Don’t forget to add a few drops of vanilla essence to infuse that sweet fragrance.
    6. Steam the Pudding:
      • Pour the custard mixture into the caramel-coated container. Use a spatula to smooth out the top.
      • Steam the pudding for 30 minutes. Make sure to remove the cover occasionally to prevent condensation from dripping into the pudding.
    7. Patience, Patience:
      • Once the pudding is cooked, let it cool completely. This is where your patience comes into play—no sneaking bites just yet!
      • Chill the pudding in the fridge for at least 2 hours (overnight works best).
    8. Demould and Enjoy:
      • After the pudding has chilled, carefully demould it onto a plate, and voilà—your Custard Pudding is ready to enjoy!

    There you have it—your own bowl of creamy, dreamy Custard Pudding. The recipe might require a bit of patience, but trust me, it’s worth the wait. Go ahead, serve it with a smile, and enjoy the fruits of your labor!
  • Post-lockdown, I find myself missing pizza every single week! The cravings are real and absolutely irresistible.

    Over time, I’ve made pizza so many times that I can confidently say I’ve developed a skillset in pizza-making! It’s now one of my favorite things to bake, and I enjoy it so much that I often end up making three pizzas in one go. The process is easy-peasy, and the secret lies in the crust—it must be soft and perfect!

    For this recipe, I’ve used yeast, but don’t worry if you don’t have any on hand. I’ll share a no-yeast version in an upcoming post, so stay tuned!

    Let’s Get Started: The Pizza Recipe

    Ingredients for the Dough:

    • Yeast
    • Warm water
    • Sugar
    • Flour or wheat flour
    • Butter
    • A pinch of salt

    For the Toppings:

    • Paneer
    • Onions
    • Capsicum
    • Tomatoes
    • Corn
    • Chilly powder
    • Salt
    • Melted butter
    • Grated garlic
    • Mozzarella cheese (or any cheese you prefer)
    • Pizza sauce or spread

    Method:

    1. Activate the Yeast:
      • Add yeast to warm water with a pinch of sugar. Make sure the water is warm, not hot, to avoid killing the yeast. Let it rest until the yeast activates and becomes frothy.
    2. Prepare the Toppings:
      • Marinate paneer, onions, capsicum, tomatoes, and corn with chilly powder, salt, melted butter, and grated garlic. Let the flavors infuse while you prepare the dough. (You can also skip marinating and add the toppings directly!)
    3. Make the Dough:
      • In a mixing bowl, blend flour (or wheat flour), butter, and a pinch of salt. Gradually pour in the activated yeast mixture and knead the dough until it’s soft.
      • Cover the dough with a damp cloth and let it rest for 20 minutes. Once it rises, the dough might feel sticky. Sprinkle some flour on your platform and knead it again until smooth.
    4. Shape the Pizza Base:
      • Divide the dough into balls based on the size of the pizzas you want to bake.
      • Grease your bakeware and spread the dough into a circular shape using clean hands. Pinch the edges slightly to form a crust.
      • Keep the base moderately thick—neither too thin nor too thick.
    5. Assemble the Pizza:
      • Brush the pizza base with your favorite pizza sauce or spread.
      • Add the marinated toppings evenly across the base. Sprinkle a generous amount of mozzarella cheese (or any cheese you love) over the top.
    6. Bake to Perfection:
      • Preheat your oven/OTG to 180°C.
      • Place the pizza on the middle rack and bake for 25 minutes until the crust is golden and the cheese is bubbly.
    7. Garnish and Serve:
      • Once baked, garnish with chili flakes and oregano for that final touch of flavor.
    Pizza Mania

    And there you have it—your homemade pizza that’s soft, flavorful, and guaranteed to satisfy even the strongest cravings. Perfect for cozy dinners, midnight snacks, or simply treating yourself!

    Enjoy every bite and don’t forget to experiment with toppings to create your own signature pizza!

  • When it rains! I miss being a kid!


    Rainy day, returning from school, paper boats, getting drenched in the rain, jumping on the puddle, fishing, the touch me not plant, Pakode, wet uniforms and shoes, drying the bag and notebooks in fan, awaiting for rainbow, sharing umbrella so many priceless memories!


    Onion and aloo pakoda, bhutta, roasted groundnuts were the evening ritual during rain! My grandmother used to roast the sweet potatoes too! Now they are part of memories..


    All you need to do is roast them on stove. Also, you can simply set them on a pan covering it with a lid to cook it quicker.

    Garnish with lemon, chaat masala, black salt and chilly powder.

    Roasted Sweet potato

  • Jeera Biscuits – Atta – No Maida

    Jeera Biscuits are a cherished childhood treat, blending the comforting aroma of cumin with a crispy texture and a hint of sweetness. Perfectly paired with a steaming cup of tea, they offer more than just flavor-they’re packed with digestive benefits, thanks to the cumin seeds. Made with whole wheat flour, these biscuits are not only a trip down memory lane but also a wholesome and healthier snack option for any time of the day

    The earthy, aromatic flavor of jeera always takes me back to childhood. My grandmother swore by its digestive benefits, soaking jeera overnight and drinking the water first thing in the morning. While I admired her dedication, I preferred my bubbly Jeera Soda instead!

    As I grew older, my mother took up the habit and encouraged me to try jeera water too. But I wasn’t a fan—its bland taste and the thought of drinking “stale water” clashed with my obsessive tendencies. Eventually, we struck a compromise: I’d soak jeera in the morning and drink it after lunch or dinner.

    To my surprise, within days, I noticed the difference—no bloating, no heaviness after meals, and my digestion felt lighter. I was hooked! This simple yet effective remedy is now a part of my daily routine. If you haven’t tried it yet, you might want to!

    Lately, I’ve been experimenting with Ajwain (Carom seeds), too—stay tuned for a recipe featuring this powerhouse ingredient. But for now, let’s dive into a recipe that combines the goodness of jeera with the sweet memories of childhood: Jeera Biscuits.


    The Recipe:

    These biscuits are a perfect mix of mild sweetness and cumin’s earthy aroma. They’re easy to make, healthier with whole wheat flour, and pair beautifully with a hot cup of chai.

    Preparation Time: 1 hour


    Ingredients

    • 1 1/2 cups Wheat Flour (Atta)
    • 1/3 cup Butter (softened)
    • 1/2 cup Powdered Sugar
    • 2 pinches Salt
    • 1–2 tbsp Cumin (Jeera), roasted
    • 1–2 tbsp Sugar (for garnish)
    • 1 cup Milk

    Method

    Step 1: Prepare the Jeera

    • Roast the cumin in a pan until aromatic. Crush half of it with a rolling pin, keeping the rest for garnish.
    • Ensure the butter is soft but not melted—room temperature works best.

    Step 2: Make the Dough

    • In a bowl, whisk the softened butter and powdered sugar until creamy.
    • Gradually add the wheat flour, kneading gently. If the dough feels dry, add 2–3 tbsp of milk at a time.
    • Mix the crushed cumin into the dough. Cover it with a cloth and let it rest for 15 minutes. For firmer dough, refrigerate it.

    Step 3: Roll and Shape

    • Roll out the dough on a greased surface or butter paper to about one-third inch thickness.
    • Cut into shapes using a knife or cookie cutter. Sprinkle the reserved cumin and sugar on top, gently pressing them into the dough.

    Step 4: Bake

    • Preheat the oven to 150°C (300°F). Grease a baking tray and place the shaped biscuits on it, leaving space between each piece.
    • Bake for 20 minutes or until golden. If the biscuits are thicker, bake for an additional 5 minutes.
    • Cool on a wire rack, allowing them to crisp up further.

    Storage and Serving

    Once completely cooled, store the biscuits in an airtight container. They’ll stay fresh for weeks, making them the ideal snack for tea time or anytime you crave a wholesome treat!

Design a site like this with WordPress.com
Get started