Hail Lord Jagannath! A foodie, mindfulness coach, and a proud 90s kid who believes that life is best served with a side of nostalgia and a sprinkle of humor. Cooking is my lifelong love affair, where every dish I make is more than just food, it’s a piece of my story, a tradition carried forward, or a memory revived. From traditional recipes I learned growing up to experiments in the kitchen, cooking has been my way of staying grounded and creative mostly inherited by my Dad.
Whether it’s doodling, making candles, coaching, gardening, or clicking pictures of my favorite sunset, I’ve never met a creative hobby I didn’t like. If there’s a way to make something beautiful, I’ll find it.
Corporate escapee turned writer and coach – someone who’s walked the tightrope of stress and balance, I’ve embraced mindfulness as a way of life. Now, I guide others to find their calm, connect with themselves, and rediscover joy in the chaos of life.
I grew up in a home where food wasn’t just sustenance—it was an experience. Summers were for juicy mangoes, monsoons called for crispy pakoras, and festive feasts were a chaotic yet magical celebration of family and flavors. Every recipe I share comes with its own little slice of nostalgia and a story that’s often as warm as the dish itself.
Cooking, much like mindfulness, has taught me to savor the present moment. Whether it’s the soothing rhythm of chopping vegetables or the meditative focus of kneading dough, food has a way of anchoring me to what matters most. It’s this blend of mindfulness and flavor that I bring into my coaching and my stories.
This blog is my little corner of the world where stories meet spices, mindfulness meets maggi, and nostalgia meets the next big meal. So, let’s cook, reminisce, and create moments that nourish not just the body, but the soul too.
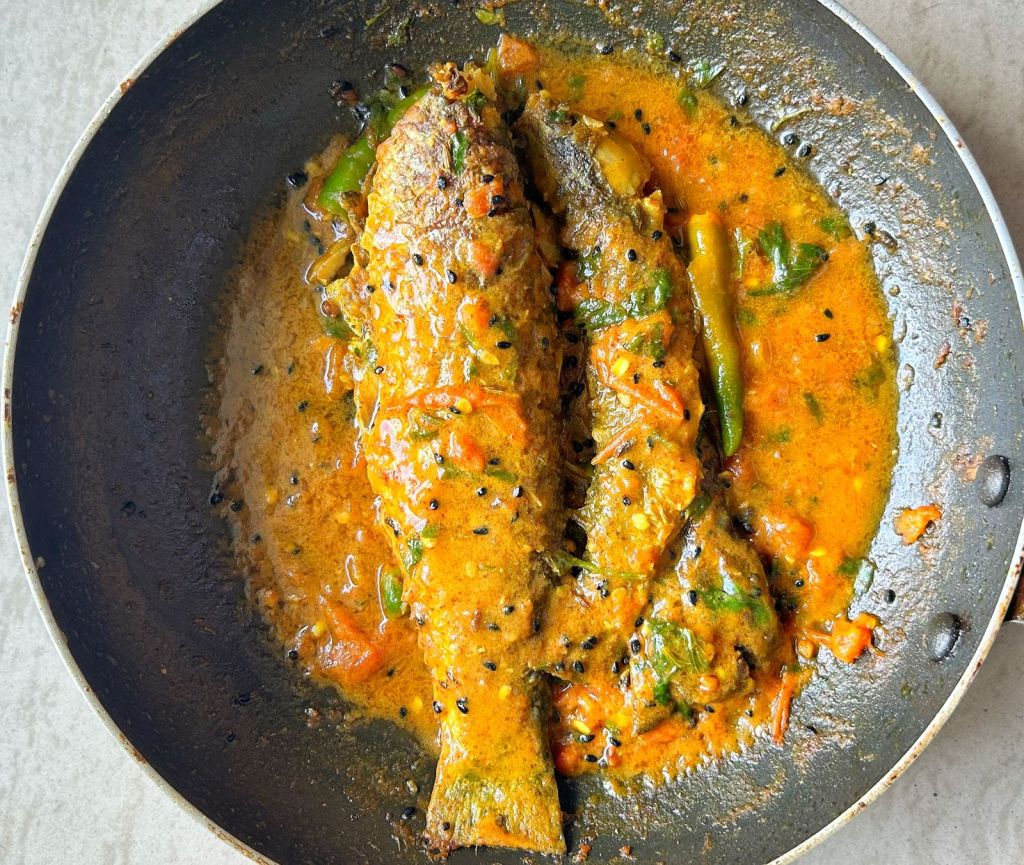
Ambula diya macha holds a special place in my heart—it’s my absolute favorite! I carefully preserve my ambula every year, using it sparingly until my next trip home.
The way the besara (mustard masala) blends with the tangy ambula is simply irresistible. Pohala macha, my all-time favorite fish, is now available in Bengaluru markets, but the nostalgia it brings is unmatched.
Whenever I’m home, mom knows that if it’s fish, it has to be Pohala. She crisps it up beautifully in mustard oil—one piece for me to savor right away, while the rest goes into the flavorful gravy.
A delightful combination of tangy ambula and crispy fried Pohala macha that perfectly complements plain rice. This dish, deeply rooted in Odia cuisine, brings together the earthy flavor of mustard masala (besara) and the sour punch of ambula.
Ingredients:
500 gms Pohala macha (small fish)
1 tbsp mustard seeds
1/2 tsp cumin seeds
4 garlic cloves
3 to 4 dry red chilies
1 tsp turmeric powder
1/4 tsp panch phutan (five-spice mix)
2 to 3 tbsp mustard oil
2 to 3 dry mango pieces (Ambula)
Salt to taste
Coriander leaves for garnishing
1 tbsp lemon juice
Method:
Prepare the Besara Paste:
Soak mustard seeds, cumin seeds, garlic cloves, and dry red chilies for 30 minutes.
Grind them to a smooth paste, adding a pinch of turmeric for better preservation and enhanced flavor.
Marinate the Fish:
Clean the Pohala macha thoroughly.
Marinate with salt, lemon juice, and turmeric powder. Let it sit for 10-12 minutes.
Fry the Fish:
Heat mustard oil in a pan. Fry the marinated fish pieces over high heat until golden brown.
Remove and set aside.
Prepare the Gravy:
Add 3 tsp of mustard oil to the same pan. Add panch phutan and let it splutter.
Stir in the prepared besara paste and sauté until the raw smell fades.
Add turmeric powder and salt, then pour in 1 cup of water.
Bring the gravy to a boil, cooking for 5-10 minutes.
Add Fish and Ambula:
Gently add the fried fish pieces to the boiling gravy.
Add the ambula pieces and cook for another 3-5 minutes to let the flavors blend.
Garnish and Serve:
Garnish with fresh coriander leaves.
Serve hot with plain steamed rice.
Tip:
While grinding the besara, add a bit of turmeric powder – it can be stored in a air tight jar for weeks. Ensure not to use a damp spoon.
Enjoy the perfect harmony of tangy, spicy, and earthy flavors in every bite!
A traditional Odia delicacy, Macha Bihana Bara (ମାଛ ମଞ୍ଜି ବରା) is made from fish eggs, typically of Rohu fish. These crispy fritters are a summer favorite, especially paired with fermented rice (Pakhala Bhaata). It’s a dish that balances the less flavorful fish fry with the richness of fish egg fritters.
I will always cherish those moments when I stood near the kitchen, impatiently asking my grandmother to pass me one piping hot bihana to sneak in before lunch. Those stolen bites were pure joy!
Preparation Time: 30 minutes
Ingredients:
Fish eggs (preferably Rohu fish)
Turmeric powder
Salt to taste
Finely chopped onions
Green chilies (as per taste)
Coriander leaves (finely chopped)
Mustard oil (for frying)
Lemon juice (for garnish)
Method:
Preparation of Fish Eggs:
Wash the fish eggs thoroughly, ensuring to remove as much of the transparent layer as possible.
Seasoning:
Mash the fish eggs using your hands and mix them with turmeric and salt.
Let it marinate for a few minutes or proceed immediately.
Add Flavor:
Mix the marinated eggs with finely chopped onions, green chilies, and coriander leaves.
Shaping and Frying:
Heat mustard oil in a flat tawa (griddle).
Scoop small portions of the mixture, shape them into patties with your palms, and gently place them on the tawa.
Use a spoon to flip the fritters carefully, as they may splatter.
Cook Until Golden:
Fry on both sides until golden brown and fully cooked.
Serve Hot:
Garnish the fritters with a squeeze of fresh lemon juice and serve hot with Pakhala Bhaata or enjoy them as a standalone snack.
Pro Tip: These fritters might splutter during frying, so a little extra care is needed. But the crispy exterior and flavorful interior make it absolutely worth it! Perfect for summer meals or a nostalgic Odia treat.
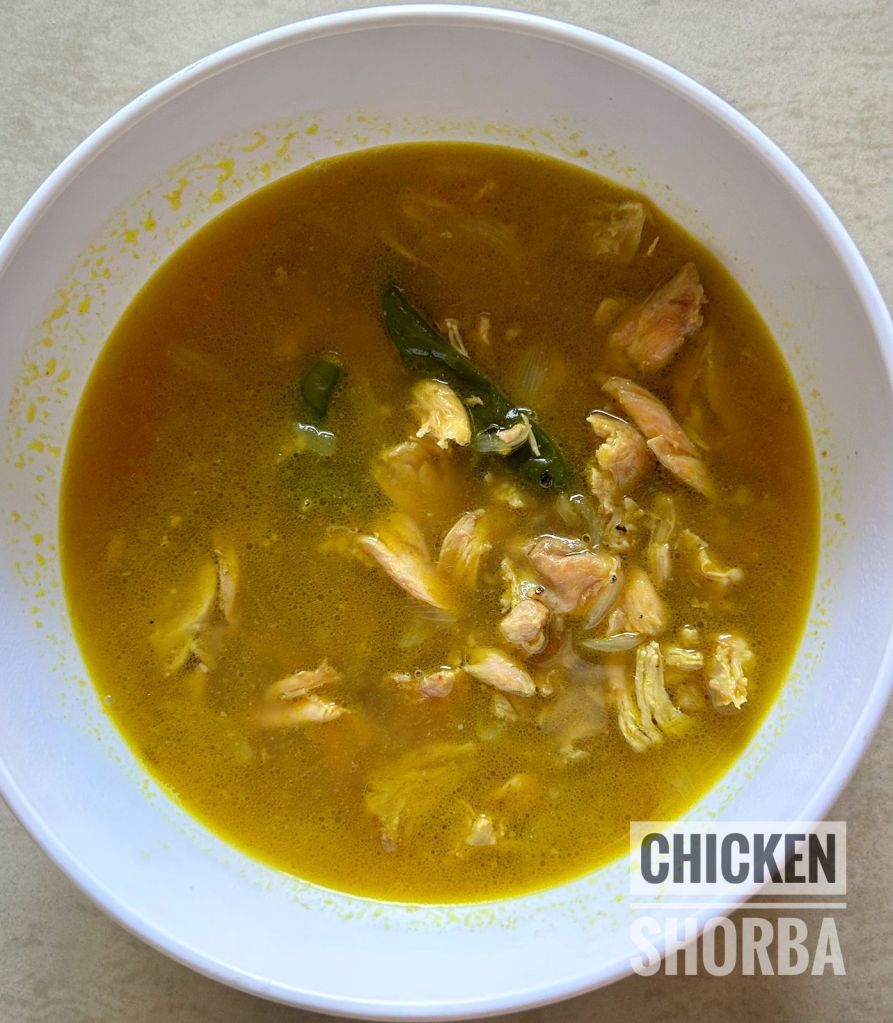
This recipe is perfect for cold, rainy days when you want something warm, delicious, and easy to make. You eat and sip at the same time, just like the old Indian ad goes: “Pii ke khao, khake piyo!” (I cn’t recollect the name of the ad).
Everyone at home loved it, just like I did after discovering it on Instagram and inspired by some Pakistani food series!
Recipe:
Preparation Time: 25-30 minutes Ingredients:
Cloves
Cardamom
Cinnamon
Bay leaf
Garlic cloves
Crushed peppercorns
Butter or ghee
Onions (optional, but I skipped)
Turmeric
Salt to taste
Green chilies
Coriander leaf stalks
Bone-in chicken pieces
Water
Method:
In a pan, heat butter or ghee and sauté cloves, cardamom, cinnamon, bay leaf, garlic cloves, and crushed peppercorns until fragrant.
If you’re using onions, you can add them at this stage, but I’ve skipped it for simplicity.
Add turmeric, salt, green chilies, and coriander leaf stalks, and sauté for a minute.
Add the bone-in chicken pieces and cook until the chicken is well-seared.
Pour water over the chicken and other ingredients, ensuring everything is covered.
Pressure cook for 5-6 whistles until the chicken is cooked thoroughly and tender.
On a lazy Monday afternoon, while working from home, I decided to whip up a quick yet delicious dish: chicken and vegetables together. I love how green veggies and protein come together in a salad, and this combination was perfect. While I know cooking and cleaning can be a hassle, trust me, this recipe requires minimal effort and doesn’t need multiple dishes or chores. Just a few ingredients, one pan, and you’re done! It’s a perfect quick meal when you’re short on time but craving something nutritious and tasty.
Preparation Time: 20-25 minutes Ingredients:
Chicken leg pieces (or boneless chicken)
Beans
Capsicum
Boiled corn
Broccoli
Lettuce
Onions
Carrots
Ghee or butter
Salt to taste
Pepper to taste
Soy sauce
Chili flakes
Oregano (or seasoning of your choice)
Finely chopped garlic
Method:
Steam the vegetables (beans, capsicum, boiled corn, broccoli, lettuce, onions, and carrots) together, making sure they stay crispy and don’t overcook.
In a pan, heat ghee or butter and sauté the chicken until fully cooked. Add salt and pepper to taste.
Once the chicken is done, add a little more ghee or butter to the pan. Sauté the finely chopped garlic until aromatic.
Add the steamed vegetables to the pan with the garlic and toss them gently. Be careful not to overcook the veggies—they should remain crispy.
Season the veggies with soy sauce, salt, pepper, chili flakes, and oregano (or your preferred seasoning).
Add the cooked chicken to the vegetable mixture, toss everything together, and cook for a couple of minutes.
Serve the dish hot and enjoy the delicious chicken and veggie goodness!
This quick and healthy dish is packed with greens, protein, and lots of flavor!
Ah, you see quite a lot of other things here, but today, I’m going to share about Podo Pitha.
Raja Parba is incomplete without it! This traditional Odia delicacy is a labor of love and patience. I feel it’s one of the most challenging recipes to master, but once you get it right, it’s a cakewalk every time after that.
Podo Pitha is customized across Odisha—some use sugar, others jaggery, and many add dry fruits and grated coconut for that extra richness. Recently, I’ve even seen people making it like a proper cake with frosting, and while the modern twist is fascinating, the love for the authentic Podo Pitha remains unshaken.
It’s the essence of tradition, nostalgia, and flavor, wrapped in one humble dish!
I remember how my hands used to start aching while mixing the rice and jaggery batter for Podo Pitha. It was such a task! My mom would always step in and take over, her hands moving with effortless ease, while I watched in awe.
Back then, I never dared to try making it on my own—it felt too daunting. But now, even my husband helps me out in the mixing as he used to do the same for his mother, and it’s a wonderful feeling to finally get it right. The effort feels worth it every single time!
Pitha Panna was always a team effort. I vividly remember how every family member would come together to help—one preparing the batter, another wrapping it, and someone else frying. It was such a beautiful symphony of togetherness!
The excitement would double when I’d return from school and see all the neighborhood aunties gathered, laughing, chatting, and working in perfect harmony. My Ayi (grandmother) would often say, “This is the beauty of a joint family and having loving people around you.” She never held grudges or indulged in fights; her warmth and positivity were unmatched.
But now, times have changed. People seem to carry more hatred and trust issues, and while I agree it works both ways, I can’t help but miss those golden days of pure connection and love.
Anyway, I won’t deviate further—here’s the recipe!
Ingredients
• 1 cup rice
• 1/2 cup split or whole husked urad dal
• 1 cup jaggery
• 3/4 cup grated coconut
• 1-inch ginger, finely chopped and pounded
• 1 tsp crushed green cardamom pods and black peppercorns
• 1/4 tsp roughly crushed fennel seeds
• 5-6 bay leaves
• 4 tbsp ghee (or oil, though ghee enhances the flavor)
• 1 tsp salt
• 1 tsp baking powder
• 1 tbsp brown sugar or jaggery powder for dusting the pan
• 1/4 cup thinly sliced coconut
• 1/2 cup cashews and raisins
• 1-2 banana or sal leaves (optional, to wrap the batter)
Method (Kadai Version)
1. Soaking and Fermentation
• Soak rice and urad dal for 5-6 hours or overnight.
• Wash and drain the water, then grind into a coarse paste using as little water as possible.
• Leave the batter to ferment for 3-4 hours. If you’re in a hot climate, 1-2 hours will suffice.
2. Preparing the Garnish
• Heat 1 tsp ghee in a pan and roast cashews and raisins until the raisins puff up. Keep aside.
3. Prepping the Kadai
• Take a heavy-bottomed kadai with a tight-fitting lid. Place a stand or a thick layer of salt at the bottom to create an even heat source.
• Cover with the lid and preheat on medium flame for 10 minutes.
4. Greasing the Pan
• Grease a cake tin or any deep vessel that fits inside the kadai with ghee.
• Dust it with brown sugar or jaggery powder. Tear 4 bay leaves and line the base of the pan.
• If using banana or sal leaves, line the tin with the leaves first.
5. Mixing the Batter
• In a large bowl, mix the fermented batter with jaggery, grated coconut, half the sliced coconuts, remaining ghee, cardamom, pepper, fennel, remaining bay leaves (torn into bits), salt, baking powder, and half of the roasted cashews and raisins.
6. Assembling and Cooking
• Pour the batter into the prepared tin and decorate the top with the remaining cashews, raisins, and sliced coconut.
• Place the tin on the stand inside the preheated kadai. If you have an oven, you can bake it as per the instructions.
• Cover with the lid and cook on low flame for 50-60 minutes. Check periodically after 40 minutes.
7. Checking Doneness
• Insert a toothpick or knife to check if it’s done-it should come out clean. If not, cook for another 5-10 minutes.
8. Cooling and Serving
• Let the Pitha cool completely before slicing.
Tip-The slow cooking in a kadai gives the Pitha an authentic smoky flavor, similar to the traditional method. Adjust the flame to ensure even cooking without burning the base.
During those days, rice would take a backseat because Pitha would reign supreme! It was a tradition to prepare various types of Pitha in large quantities, enough to last for days.
Stored carefully, they could be savored at any time—be it breakfast, lunch, or even as an evening snack. The best part? Each bite carried the essence of family love and togetherness, making every meal special, no matter the time of day.
There’s something magical about the winter sun, isn’t it? Back in my hometown, winters were all about gathering under the sun, sitting in a circle, and enjoying meals that stretched endlessly. No phones, no distractions—just hearty conversations, shared laughter, and plates full of homemade goodness.
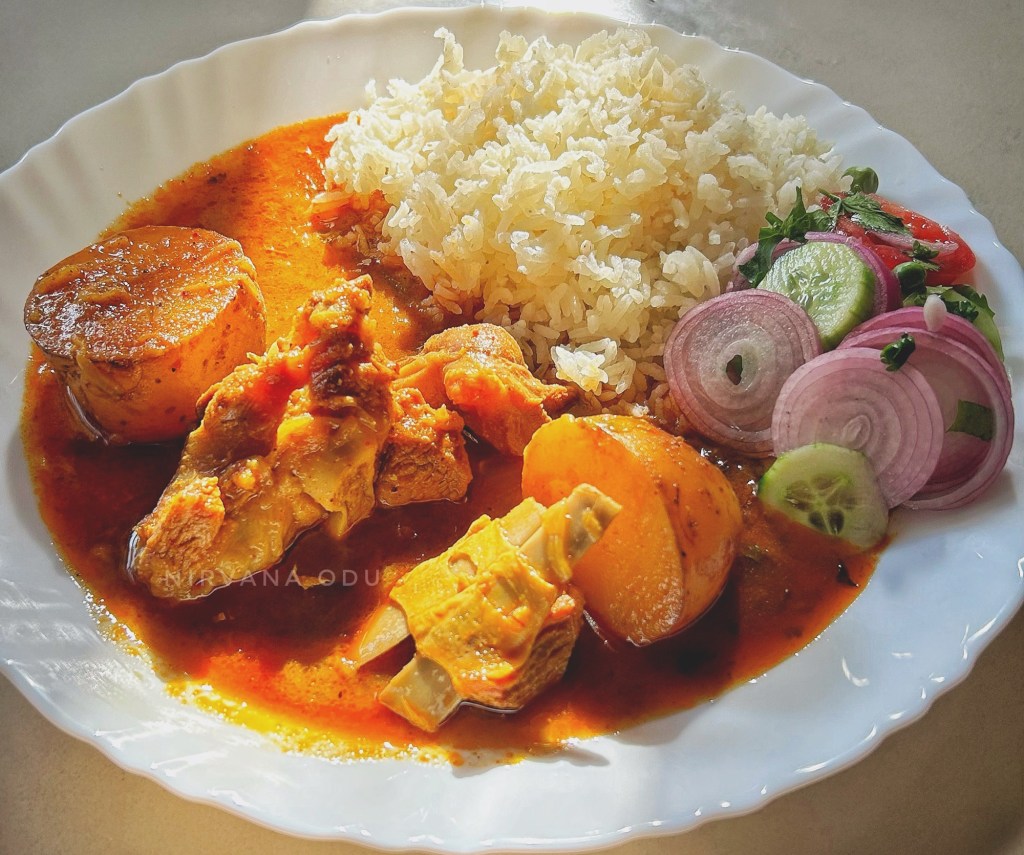
Sundays had their own charm, especially with the ritual of “Mangsa Jhola” (mutton curry). The warmth of the food, the sunshine on our backs, and the simplicity of those moments—absolute bliss!
While red meat has taken a backseat in my diet these days, the nostalgia of those meals, especially Bapa’s hatha randha (Dad’s special touch in cooking), often draws me back. A bite here and there, and I’m instantly transported to those sun-soaked afternoons, savoring not just the food but the love and memories that came with it.
Here’s to winter, nostalgia, and the small joys that make life beautiful!
Preparation Time:
• Marination: 1–2 hours
• Cooking: 1 hour
Ingredients:
For Marination:
• Mutton (goat meat) – 500 g
• Turmeric powder – ½ tsp
• Red chili powder – 1 tsp
• Curd (yogurt) – 2 tbsp
• Salt – As per taste
For Cooking:
• Mustard oil – 4 tbsp
• Potatoes – 2 medium, peeled and halved
• Onions – 3 large, finely sliced
• Tomatoes – 2 medium, chopped
• Ginger-garlic paste – 2 tbsp
• Bay leaves – 2
• Cinnamon stick – 1 inch
• Cardamom pods – 3
• Cloves – 4
• Dry red chilies – 2
• Cumin seeds – 1 tsp
• Turmeric powder – ½ tsp
• Red chili powder – 1 tsp
• Coriander powder – 1 tsp
• Garam masala powder – ½ tsp
• Salt – As per taste
• Water – 2–3 cups (adjust for gravy consistency)
• Fresh coriander leaves – For garnish
Method:
Step 1: Marinate the Mutton
1. Wash the mutton thoroughly and pat it dry.
2. In a bowl, mix mutton with turmeric powder, red chili powder, curd, and salt.
3. Cover and let it marinate for 1–2 hours for the flavors to seep in.
Step 2: Fry the Potatoes
1. Heat 1 tbsp mustard oil in a kadhai (deep pan).
2. Lightly fry the potato halves until golden. Remove and set aside.
Step 3: Prepare the Masala Base
1. In the same pan, heat the remaining mustard oil until it smokes slightly (to reduce its pungency).
2. Add bay leaves, cinnamon, cardamom, cloves, dry red chilies, and cumin seeds. Let them splutter.
3. Add the sliced onions and sauté until golden brown.
4. Add the ginger-garlic paste and cook until the raw smell disappears.
5. Stir in the chopped tomatoes and cook until they turn soft and mushy.
Step 4: Cook the Mutton
1. Add the marinated mutton to the masala base.
2. Mix well and cook on medium heat for 15–20 minutes, stirring occasionally, until the mutton starts releasing its juices and oil separates.
3. Add turmeric powder, red chili powder, coriander powder, and salt. Mix well.
Step 5: Simmer with Potatoes
1. Add the fried potatoes and mix gently.
2. Pour 2–3 cups of water, depending on the desired gravy consistency.
3. Cover and cook on low heat for 40–50 minutes, stirring occasionally, until the mutton becomes tender.
• Tip: Use a pressure cooker for quicker cooking (3–4 whistles).
Step 6: Final Touch
1. Sprinkle garam masala powder and mix.
2. Simmer for another 5 minutes.
3. Garnish with freshly chopped coriander leaves.
Serving Suggestion:
Serve Mangsa Jhola hot with steamed rice, freshly made rotis, or piping hot luchis (fried puris).
The aroma of mustard oil, spices, and the slow-cooked mutton is sure to transport you to those special Sunday lunches in Odisha!
I remember those summer vacations in my village. We used to go there without fail every year during that time. I recall gulping down breakfast and cha before rushing out to the fields with my Mausi. Yes! A scavenger hunt! For mushrooms, soap nuts, raspberries, tamarind, kanchan pool (edible flowers), and so much more.
I remember the no man’s land with lots of abandoned fields and thatched roof huts. Mushrooms would sprout there like flowers. My Mausi was a pro—she would name them all and warn me about the poisonous ones. She even told me stories about how snakes left their poison on some (hey, I don’t know if it was true, but I believed it). I would carefully pluck the mushrooms and fold them neatly into the bottom of my frock (we didn’t carry baskets). Then I’d rush straight home to my grandma.
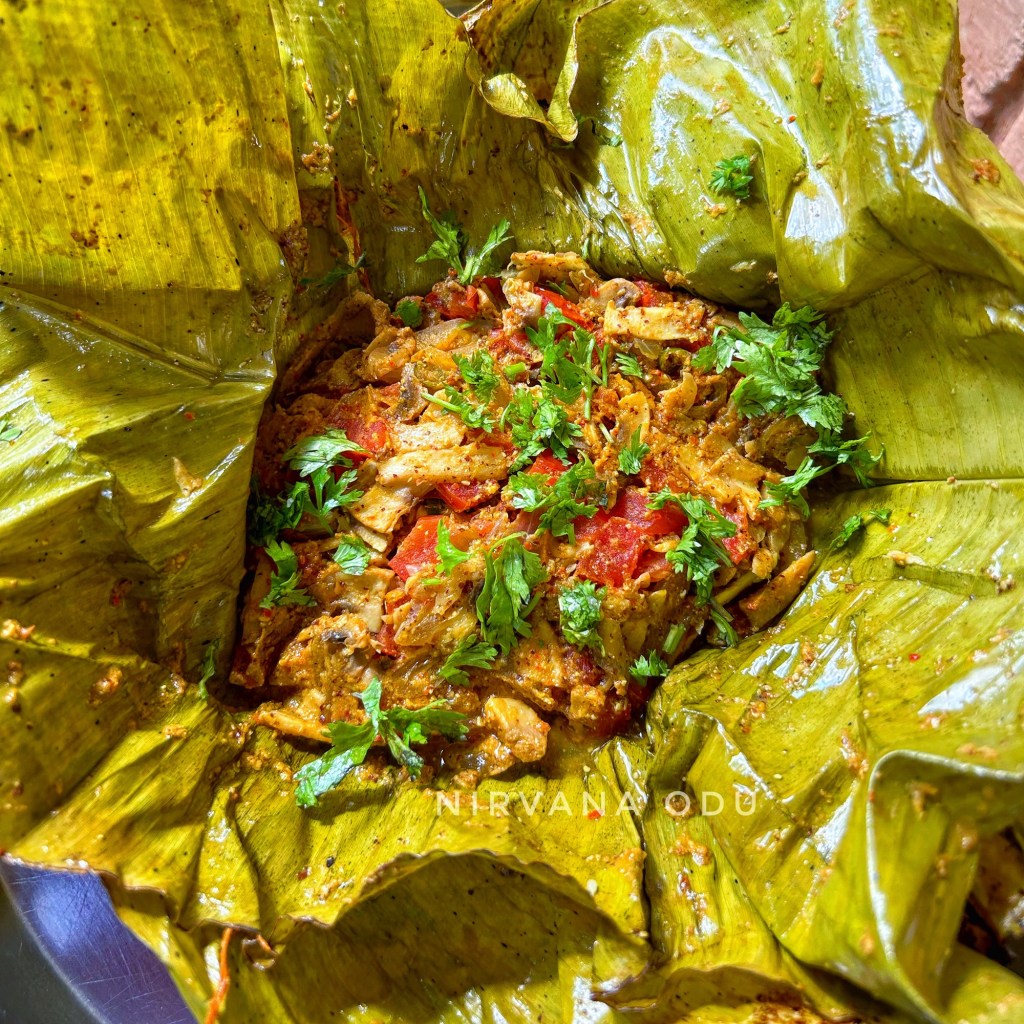
In rural areas, the food schedule was unbreakable, so Maa wouldn’t interrupt the rice boiling in a big dekchi on the chulha. She’d smile at me, take the mushrooms, clean them, add some magical masalas—chop, chop—and wrap them in banana leaves, tie them with thread, and throw them straight into the fire. I remember my dad using pumpkin leaves once!
Everyone would gather on the floor with their pakhala kansa and a lot of paga. This patra poda would be placed in the middle, and oh, the taste—so earthy and delicious. My dad even showed me the actual maal that went inside!
Ingredients:
• Fresh mushrooms (cleaned and sliced) – 250g
• Mustard seeds – 2 tbsp
• Green chilies – 3-4 (adjust as per spice preference)
• Garlic cloves – 4-5
• Fresh coriander leaves – a handful (chopped)
• Turmeric powder – 1/2 tsp
• Salt – to taste
• Mustard oil – 2 tbsp
• Banana leaves (or pumpkin leaves) – as needed (cleaned and softened by passing over a flame)
• Thread – for tying
Method:
1. Prepare the Mustard Paste:
• Soak the mustard seeds in water for 10 minutes.
• Grind the mustard seeds with garlic, green chilies, and a little water to form a smooth paste.
2. Prepare the Mushroom Mixture:
• In a mixing bowl, combine the cleaned mushrooms, mustard paste, turmeric powder, salt, and mustard oil.
• Add chopped coriander leaves and mix well to coat the mushrooms evenly.
3. Wrap in Leaves:
• Take a banana or pumpkin leaf, place a portion of the mushroom mixture in the center, and fold it into a neat packet.
• Tie the packet securely with thread to ensure it doesn’t open during cooking.
4. Cook on Open Fire:
• Place the wrapped packets directly on the hot coals or fire. If you don’t have an open flame, you can cook them on a hot griddle or tawa over medium heat.
• Cook for about 10-15 minutes, turning occasionally to ensure even cooking. The leaves will char, imparting a smoky flavor.
5. Serve:
• Open the packets carefully to reveal the aromatic, earthy patra poda.
• Serve warm with pakhala bhata (fermented rice) or as a side dish with your meal.
Tips:
• If you don’t have banana or pumpkin leaves, aluminum foil can be used, though it won’t provide the same earthy flavor.
• Adjust the spice level by varying the amount of green chilies in the mustard paste.
• For added flavor, sprinkle a little lemon juice before serving.
Enjoy this traditional delicacy with its authentic rustic charm!
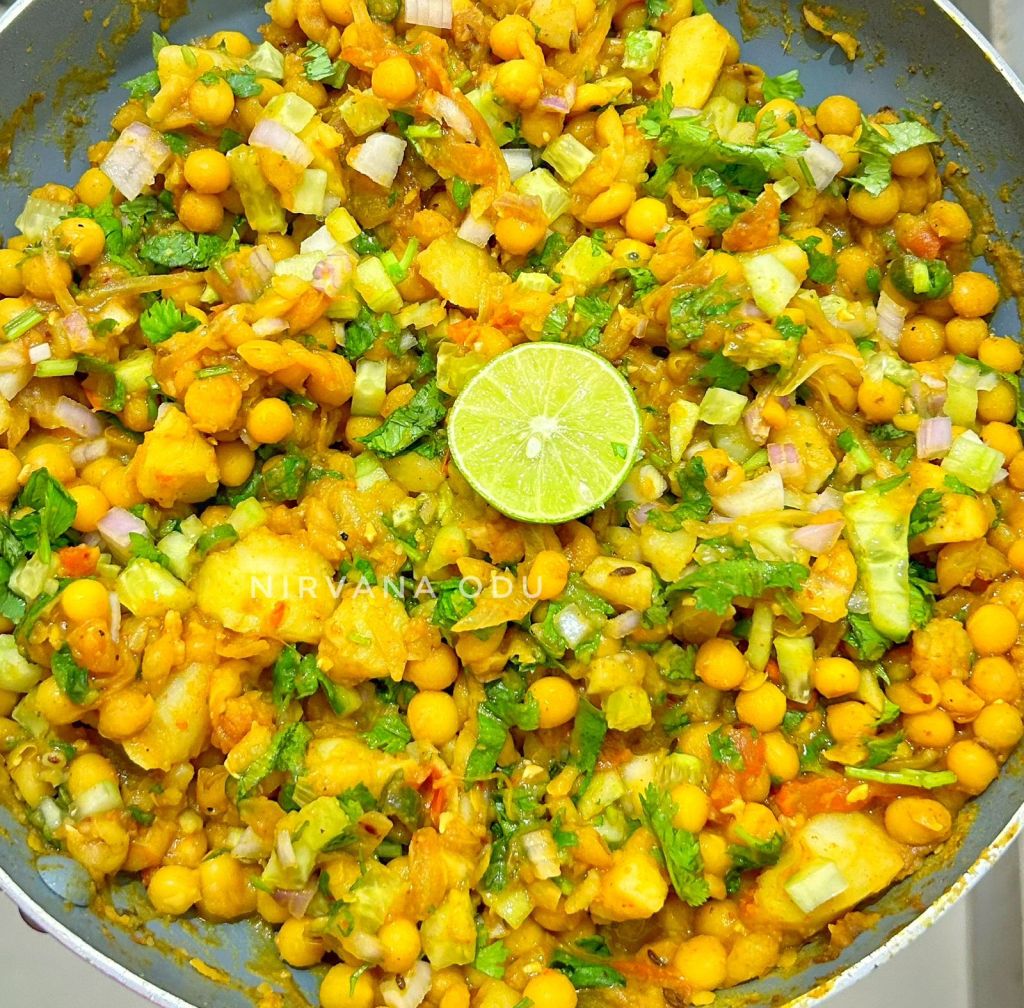
Ah, Ghuguni or Ghugni! When you think about Ghuguni, your mouth waters. Same with chaat, right?
Now, imagine when both come together – it’s pure magic! Right?
My Aja (Grandpa) would bring it home with some Singadas (samose) on a cold winter evenings. That’s my beloved Chaat! It was comfort food at its best. My grandmother would make it home if there was any leftover Ghuguni curry from the morning! No fancy ingredients; just Kassi (tender/seedless) cucumbers, onions, coriander leaves, the spiciest green chilies, a squeeze of lemon, and leftover aloo or boiled potatoes, topped with tamarind chutney and black salt. The taste was divine!
I recall going to Cuttack and getting piping hot Ghuguni chaat wrapped in a leaf while wiping my dribbling nose on my sweater wrist as the kuhudi (fog) set in. Ghugni chaat has several various forms throughout Odisha, each with its own twist, but its soul remains the same!
Let us now turn our attention to the recipe. You can use leftover Ghuguni from the morning or soak it overnight. The next day, boil it well until soft and tender—just as it should be. The softer the tastier! So don’t rush!
Ingredients:
1 cup gookdee (chickpeas or dried peas)
2 cups water
1 onion (finely chopped)
1 cucumber (finely chopped)
2-3 green chilies (finely chopped)
Fresh coriander leaves (for garnish)
1-2 boiled potatoes (optional)
For the gravy (if making fresh):
1 onion (chopped)
1-2 tomatoes (chopped)
1 tbsp ginger garlic paste
Salt (to taste)
1 tsp coriander powder
1 tsp cumin powder
1/2 tsp turmeric powder
1/2 tsp chili powder
2 tbsp oil
For the toppings:
Tamarind chutney
Mint chutney
Fresh coriander leaves (optional)
Black pepper
Chaat masala
Lemon (for squeezing)
Instructions:
Prepare the Ghuguni Matar or White peas :
Soak 1 cup – Ghuguni peas (white peas) overnight, or use leftover curry if you have it.
The next day, boil the matar in 2 cups of water for 5-6 whistles in a pressure cooker until soft and mushy. Set aside.
Prepare the Gravy (If making fresh):
Heat oil in a pan and sauté onions and tomatoes until soft.
Add ginger garlic paste and cook until the raw smell disappears.
Add salt, coriander powder, cumin powder, turmeric powder, and chili powder. Cook the mixture until the tomatoes break down and the spices blend well.
Add water if needed and cook on low heat until the gravy thickens. Once done, set aside.
Do not keep more gravy, it has to dry up!
Tip: Sauté the masala first and then add the soaked peas, along with 2 cups of water, and pressure cook for 5-6 whistles until soft and mushy. This helps the flavors blend perfectly.
Prepare the Fresh Toppings:
Finely chop onions, cucumbers, green chilies, and fresh coriander leaves.
Optional: Dice boiled potatoes or use leftover potatoes. Instead of dicing, we mash it partially so that the gravy is thick!
Time to assemble! :
In a serving bowl, mix the cooked ghuguni with the freshly prepared gravy (or use leftover curry).
Add the chopped onions, cucumbers, green chilies, coriander leaves, and potatoes.
Top with tamarind chutney, mint chutney, black pepper, chaat masala, and a squeeze of fresh lemon.
Serve and Enjoy!
Mix everything together, and your delicious Ghuguni Chaat is ready to serve! Perfect for a cold evening snack !
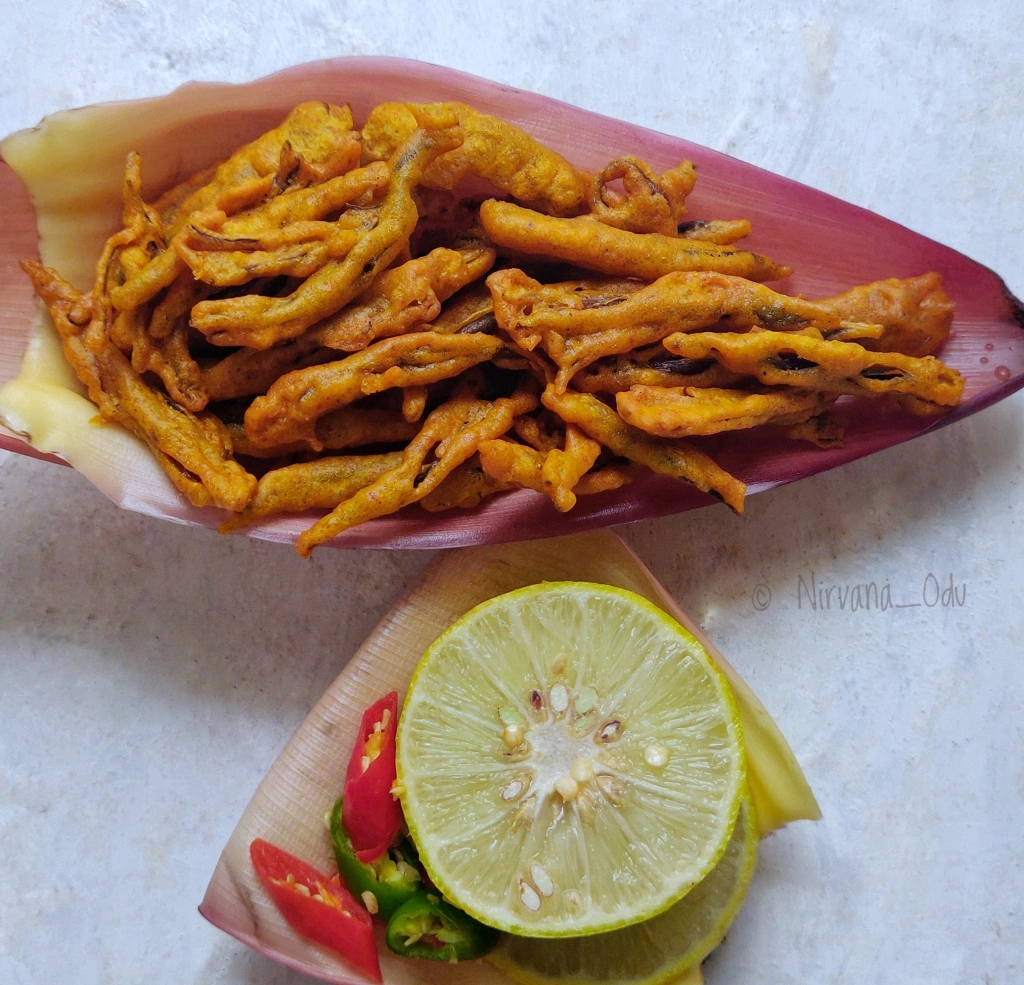
କଦଳୀ ଭଣ୍ଡା ପକୁଡ଼ି | Kadali Phoola ra Pakudi | Kele ke Phool ke Pakode
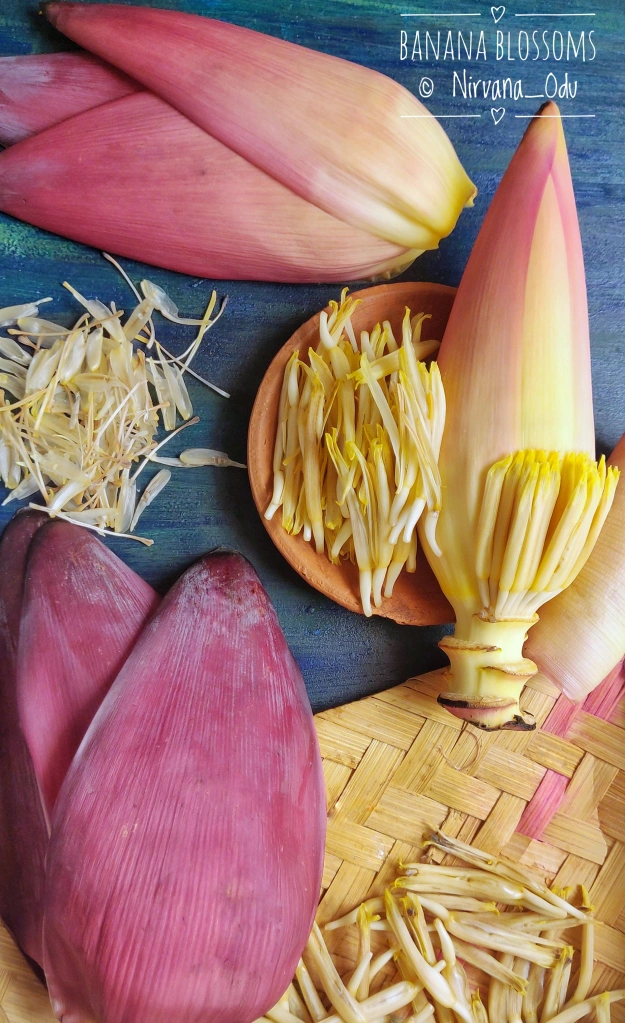
The banana tree is truly a wonder of nature! It’s incredibly versatile—almost every part of it is useful and packed with health benefits. Growing up, we had a banana tree in our backyard, and it wasn’t just a tree; it was part of our daily life and cultural practices.
I still remember how Aja (Grandpa) would tell me stories about ripening bananas. Once the bananas reached 70-80% ripeness, the tradition of sharing with neighbors began. It was a ritual, a way of bonding, and a celebration of abundance.
When it comes to the banana blossom, I must admit I’m not a fan of its mixed veg curry or simple fry (bhaja). But fritters? Now, that’s a whole different story! These crispy delights made from edible flowers are my absolute favorite.
Preparation Time:
30 minutes
Ingredients:
Banana Blossoms (cleaned)
Besan (gram flour) – 1 cup
Salt (to taste)
Turmeric powder – 1/2 tsp
Red chili powder – 1 tsp
Ajwain (carom seeds) – 1/2 tsp
Cumin powder – 1/2 tsp
Coriander powder – 1/2 tsp
Pepper powder (optional) – a pinch
Oil (for deep frying)
Method:
Step 1: Prepare the Banana Blossoms
Start by cleaning the blossoms. Remove the longest pollen strand and the white sheath from each petal, as they aren’t used in cooking.
Wash the cleaned petals thoroughly and boil them for 5 minutes in water with a pinch of turmeric and salt. This removes the pungent taste and cleanses them well.
Once boiled, drain the water and pat the petals dry with a clean towel.
Step 2: Make the Batter
In a bowl, combine besan, salt, red chili powder, ajwain, cumin powder, and coriander powder. If you like a hint of spice, add a pinch of pepper powder.
Slowly add water to the dry ingredients and whisk to form a semi-thick batter—it should coat the petals without being too runny.
Step 3: Fry the Fritters
Heat oil in a kadhai over medium flame.
Dip each banana blossom petal into the batter, ensuring it’s well-coated, and gently slide it into the hot oil.
Fry the petals until they turn a golden crispy color, flipping them occasionally for even frying.
Remove the fritters from the oil and place them on a tissue or newspaper to absorb excess oil.
Step 4: Serve and Enjoy
Serve the banana blossom fritters hot with your favorite ketchup or chutney. They’re the perfect snack for tea-time or even as a crunchy side dish.
These banana blossom fritters take me back to simpler times, when the kitchen was filled with the aroma of frying besan and the joy of sharing snacks with family. Kadali Phoola ra Pakudi is more than just a dish—it’s a celebration of the banana tree’s bounty and the traditions tied to it.
So, grab a banana blossom and give this crispy, golden delight a try. Trust me, you’ll fall in love with this edible flower!
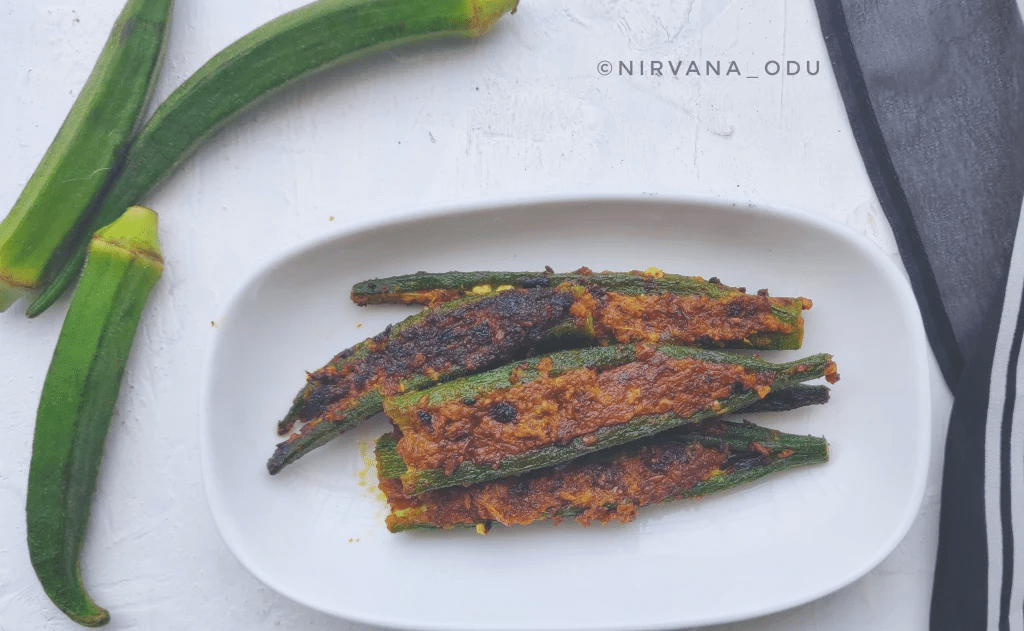
Growing up, I’ll admit it—I had a complicated relationship with okra. Its slimy texture made me squirm, and as a child, I would outright refuse to touch it. But here’s the twist: my Grandpa grew okras in our backyard, and I was always fascinated by how they sprouted, adorned with those delicate yellow flowers.
Who knew that as I grew older, this misunderstood vegetable would win over my taste buds and become my kitchen ally? And now, okra and I are friends for life. So here’s the question—Will you befriend Okra too?
Watching my mum prepare Bharwa Bhindi was mesmerizing. She had two brilliant ways to stuff these beauties:
1. Dry Spice Stuffing:
A mix of quintessential Indian spices, dry and tangy, was the star.
Red chili powder
Turmeric powder
Salt
Dry mango powder (Aamchur)
Coriander powder
Cumin powder
2. Mustard Masala Stuffing (Odia Style):
This one’s my personal favorite and a true reflection of Odia cuisine, where mustard takes center stage.
Soak cumin seeds, garlic cloves, dry red chilies, and mustard seeds in water.
Grind them into a thin, aromatic paste with minimal water.
This tangy, spicy mustard masala is the heart and soul of Odia-style okra.
Preparation:
Prep the Okras:
Wash the okra and pat them dry.
Slit them carefully lengthwise without cutting through, creating a pocket for the stuffing.
Stuff the Okras:
Take your chosen stuffing (dry spice mix or mustard masala) and smear it generously inside the okras.
Fry the Okras:
Heat mustard oil in a pan until it smokes lightly.
Fry the stuffed okras on low-medium flame until they are crisp and the masala is cooked through.
Serve:
Serve hot with steamed rice or, better yet, pair it with Fermented Rice (Pakhala Bhata / Panta Bhaat) for a soul-satisfying Odia meal.
From a childhood aversion to a staple on my plate, Bharwa Bhindi has been part of my culinary evolution. Whether stuffed with dry spices or the tangy mustard masala, this dish transforms okra into something magical.
So, here’s to okra—slimy beginnings and all—and to discovering new ways to fall in love with the ingredients you once ignored. Will you give Bharwa Bhindi a try?